ADVERTISEMENT
No-Bake Chocolate Pudding Pie
Introduction
If you’re looking for a rich, creamy, and irresistibly delicious dessert that doesn’t require turning on the oven, this No-Bake Chocolate Pudding Pie is the perfect choice. With its buttery graham cracker crust, silky chocolate pudding, fluffy chocolate cream, and generous whipped topping, every slice is a wonderful combination of chocolate flavor and creamy texture.
This classic American dessert is ideal for family gatherings, birthday celebrations, Thanksgiving, Christmas, summer parties, or any occasion when you want to prepare something special without spending hours in the kitchen.
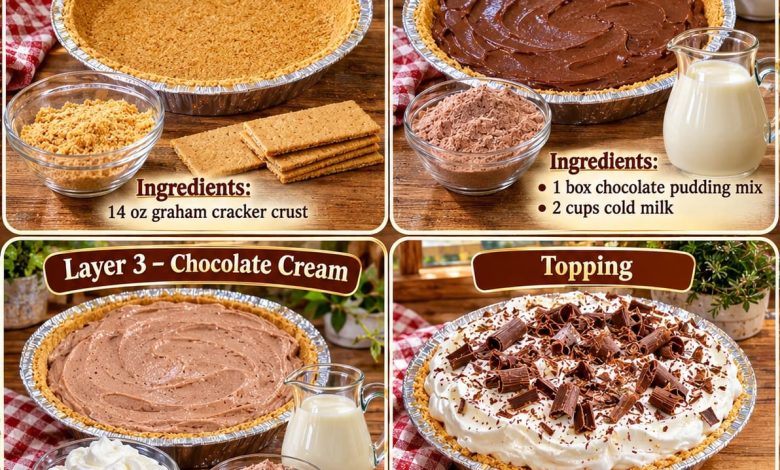
What makes this recipe so wonderful is its beautiful combination of layers. The crunchy graham cracker crust provides the perfect foundation, while the smooth chocolate pudding adds rich flavor. A lighter chocolate cream layer creates a fluffy texture, and the whipped topping finishes everything with a delicate sweetness.
Best of all, this dessert uses simple ingredients and requires no baking. With just a little preparation and some chilling time, you can create a beautiful homemade pie that looks impressive and tastes absolutely delicious.
Recipe Information
Prep Time
ADVERTISEMENT
20 minutes
Chill Time
4 hours
Servings
8–10
ADVERTISEMENT
Ingredients
Layer 1 – Graham Cracker Crust
1 prepared graham cracker pie crust (9-inch, approximately 6 oz)
The image lists a 14 oz crust; for a standard 9-inch pie, one prepared crust is sufficient.
Layer 2 – Chocolate Pudding
1 box (3.9 oz) instant chocolate pudding mix
2 cups cold milk
Layer 3 – Chocolate Cream
8 oz whipped topping, thawed
ADVERTISEMENT
1 box (3.9 oz) instant chocolate pudding mix
1 cup cold milk
Layer 4 – Whipped Topping
8 oz whipped topping, thawed
Chocolate shavings or chocolate curls, for decoration
Optional Garnishes
Mini chocolate chips
ADVERTISEMENT
Chocolate syrup
Fresh strawberries
Cocoa powder
Extra chocolate curls
Important: Use instant chocolate pudding mix for this no-bake recipe. Cook-and-serve pudding requires a different preparation method. You’ll need two separate 8 oz containers of whipped topping, one for the chocolate cream and one for the final topping.
Preparation Steps
Step 1: Prepare the Graham Cracker Crust
Begin by placing the prepared graham cracker pie crust on a flat work surface.
If you’re using a store-bought crust, carefully remove the protective plastic covering without damaging the crust.
Make sure the crust is completely intact and ready to hold the creamy chocolate layers.
Place the crust in the refrigerator while preparing the pudding.
ADVERTISEMENT
Chilling the crust helps keep it firm during assembly.
The graham cracker base adds a delicious buttery crunch that balances the smooth chocolate filling.
Step 2: Prepare the Chocolate Pudding Layer
In a large mixing bowl, combine one box of instant chocolate pudding mix with 2 cups of cold milk.
Using a wire whisk or electric mixer on low speed, beat the mixture for approximately 2 minutes.
Continue whisking until the pudding begins to thicken and becomes smooth.
Make sure there are no dry lumps of pudding powder remaining.
Allow the pudding to stand for approximately 5 minutes so it can thicken further.
The finished pudding should be creamy, rich, and thick enough to spread easily.
Step 3: Add the Chocolate Pudding to the Crust
Remove the chilled graham cracker crust from the refrigerator.
Spoon the prepared chocolate pudding into the crust.
Using a spatula, gently spread the pudding into an even layer.
Smooth the surface carefully, making sure the pudding reaches the edges of the crust.
Avoid pressing too firmly, as the graham cracker crust can be delicate.
Place the pie in the refrigerator for approximately 15–20 minutes while preparing the next layer.
This short chilling period helps the pudding become slightly firmer and makes layering easier.
Step 4: Prepare the Chocolate Cream Layer
In a separate mixing bowl, combine the second box of instant chocolate pudding mix with 1 cup of cold milk.
Whisk for approximately 2 minutes until the mixture becomes thick and smooth.
Because this layer uses less milk than the first pudding layer, it will have a thicker consistency.
Allow it to stand for approximately 3–5 minutes.
Next, add 8 oz of thawed whipped topping.
Using a rubber spatula, gently fold the whipped topping into the thick chocolate pudding.
Continue folding until the mixture becomes light, fluffy, and evenly combined.
Avoid vigorous stirring because it can reduce the airy texture of the whipped topping.
The finished chocolate cream should be smooth, mousse-like, and lighter in color than the pudding layer.
Step 5: Add the Chocolate Cream Layer
Remove the pie from the refrigerator.
Carefully spoon the fluffy chocolate cream over the chilled chocolate pudding layer.
Start in the center and gently spread the mixture toward the edges.
Use an offset spatula or the back of a spoon to create a smooth, even surface.
Try not to press too hard, as this could cause the chocolate cream to mix with the pudding underneath.
The goal is to create two distinct chocolate layers: a rich, dense pudding layer and a lighter, fluffy chocolate cream layer.
Return the pie to the refrigerator for another 20–30 minutes.
Step 6: Prepare the Whipped Topping
Place the remaining 8 oz of thawed whipped topping in a bowl.
Stir very gently with a spatula to make it smooth and easy to spread.
For a more decorative presentation, transfer some of the whipped topping into a piping bag fitted with a large star tip.
This will allow you to create beautiful swirls or decorative borders around the pie.
Keep the topping refrigerated until you’re ready to use it.
Step 7: Add the Final Whipped Cream Layer
Remove the chilled pie from the refrigerator.
Spoon the whipped topping over the chocolate cream layer.
Gently spread it across the entire surface, covering the chocolate filling.
You can create a smooth finish or use the back of a spoon to make soft decorative peaks.
For an elegant bakery-style appearance, pipe whipped cream swirls around the outer edge of the pie.
The bright white topping creates a beautiful contrast against the rich chocolate layers underneath.
Step 8: Decorate with Chocolate Shavings
Using a vegetable peeler, carefully shave a bar of semisweet or milk chocolate into delicate curls.
Alternatively, use a fine grater to create smaller chocolate shavings.
Sprinkle the chocolate curls generously over the whipped topping.
For a more dramatic presentation, concentrate some of the larger chocolate curls in the center of the pie.
You can also add mini chocolate chips or a light drizzle of chocolate syrup if desired.
The chocolate decoration adds extra flavor and gives the dessert a beautiful finishing touch.
Step 9: Chill the Pie
Cover the pie loosely with plastic wrap or a pie container lid.
Place it in the refrigerator for at least 4 hours.
For the best results, refrigerate overnight.
The chilling time allows the pudding and chocolate cream layers to become firm enough for slicing.
It also helps the flavors blend together while keeping the graham cracker crust intact.
Avoid rushing this step because a properly chilled pie will have a much better texture and presentation.
Step 10: Slice and Serve
Once the pie is fully chilled, remove it from the refrigerator.
Using a sharp knife, carefully cut the pie into 8–10 slices.
For cleaner slices, wipe the knife with a damp paper towel between cuts.
Gently lift each slice with a pie server and transfer it to a dessert plate.
Serve immediately while the filling is cold and creamy.
Each slice should reveal the beautiful layers of golden graham cracker crust, rich chocolate pudding, fluffy chocolate cream, and white whipped topping.
Tips for the Perfect No-Bake Chocolate Pudding Pie
1. Use instant pudding mix.
Instant chocolate pudding thickens without cooking and is essential for this easy no-bake recipe.
2. Make sure the milk is cold.
Cold milk helps instant pudding develop the proper thick consistency.
3. Allow each layer to set.
Briefly chilling the pudding before adding the chocolate cream helps prevent the layers from mixing together.
4. Fold the whipped topping gently.
Use a spatula and gentle folding motions to maintain the fluffy texture of the chocolate cream.
5. Don’t skip the final chilling time.
Refrigerating the pie for at least 4 hours helps the layers become firm enough to slice.
6. Use good-quality chocolate for decoration.
Chocolate curls made from a good-quality chocolate bar add a rich flavor and an elegant appearance.
7. Keep the pie refrigerated.
Because this dessert contains milk and whipped topping, it should remain refrigerated until serving.
Delicious Variations
Oreo Chocolate Pudding Pie
Replace the graham cracker crust with a prepared chocolate cookie crust.
Sprinkle crushed Oreo cookies over the whipped topping for extra chocolate flavor and crunch.
Peanut Butter Chocolate Pudding Pie
Add ½ cup of creamy peanut butter to the chocolate cream layer.
Beat the peanut butter into the thick pudding before folding in the whipped topping.
The combination of peanut butter and chocolate creates a rich, delicious variation.
Triple Chocolate Pudding Pie
Use a chocolate cookie crust instead of graham crackers.
Add ½ cup of mini chocolate chips to the chocolate cream layer and decorate with dark chocolate curls.
Chocolate Strawberry Pudding Pie
Arrange a layer of thinly sliced fresh strawberries over the chocolate pudding before adding the chocolate cream.
Decorate the finished pie with whole strawberries and chocolate shavings.
Mocha Chocolate Pudding Pie
Dissolve 1 teaspoon of instant espresso powder in 1 tablespoon of warm water.
Allow it to cool, then mix it into the chocolate cream layer for a delicious coffee-chocolate flavor.
Mint Chocolate Pudding Pie
Add ¼ teaspoon of peppermint extract to the chocolate cream layer.
Decorate with chocolate curls and crushed mint chocolate candies.
What to Serve with No-Bake Chocolate Pudding Pie
This rich and creamy dessert is delicious on its own, but it also pairs beautifully with several simple accompaniments.
Fresh Strawberries: Their natural sweetness and slight tartness balance the rich chocolate filling.
Raspberries: Fresh raspberries add a refreshing fruity contrast.
Vanilla Ice Cream: A small scoop of vanilla ice cream creates an extra-indulgent dessert.
Chocolate Sauce: A drizzle of warm or room-temperature chocolate sauce adds even more chocolate flavor.
Fresh Coffee: A cup of hot coffee pairs beautifully with the cold, creamy chocolate pie.
Hot Chocolate: For chocolate lovers, serve a small slice alongside a warm cup of homemade hot chocolate.
Make-Ahead Instructions
One of the best things about No-Bake Chocolate Pudding Pie is that it can be prepared ahead of time.
You can assemble the entire pie the evening before a party or family gathering.
Once assembled, cover it carefully and refrigerate overnight.
The extra chilling time helps the pudding layers become firm and makes the pie easier to slice.
For the freshest presentation, you can add the chocolate curls shortly before serving.
This makes the recipe especially convenient for Thanksgiving, Christmas, birthdays, and other celebrations when you want to prepare desserts in advance.
Storage Instructions
Refrigerator
Store leftover pie in the refrigerator, covered tightly with plastic wrap or inside an airtight pie container.
For the best quality, enjoy within 3–4 days.
The graham cracker crust may gradually soften as it absorbs moisture from the filling.
Freezer
You can freeze the assembled pie for up to 1 month for best quality.
Wrap it carefully to protect it from freezer odors.
For a softer, creamier texture, thaw it in the refrigerator before serving.
Alternatively, serve it partially frozen for a delicious frozen chocolate dessert.
Serving After Storage
Keep the pie chilled until you’re ready to serve.
Avoid leaving it at room temperature for more than 2 hours.
Why You’ll Love This Recipe
There are so many reasons this No-Bake Chocolate Pudding Pie deserves a place in your favorite dessert collection.
First, it requires absolutely no baking, making it perfect for warm summer days or busy holiday preparations.
Second, it uses simple ingredients that are easy to find at most grocery stores.
Third, the combination of a crunchy graham cracker crust, silky chocolate pudding, fluffy chocolate cream, and whipped topping creates an irresistible balance of textures.
Another wonderful feature is its beautiful layered appearance. Each slice looks impressive, making the pie a great choice for dinner parties and family celebrations.
The recipe is also easy to customize with different crusts, flavors, and toppings.
Best of all, you can prepare it in advance, allowing you to spend less time in the kitchen and more time enjoying special moments with family and friends.
Conclusion
No-Bake Chocolate Pudding Pie is the ultimate easy chocolate dessert, combining a buttery graham cracker crust, rich chocolate pudding, fluffy chocolate cream, and a beautiful whipped topping in every delicious slice.
Whether you’re preparing it for Thanksgiving, Christmas, a birthday celebration, or simply satisfying a chocolate craving, this creamy homemade pie is sure to impress.
With its simple preparation, beautiful layers, and rich chocolate flavor, it’s a dessert that everyone will want to enjoy again and again.
Serve it chilled, topped with generous chocolate curls, and enjoy a sweet treat that’s both elegant and wonderfully comforting.


