ADVERTISEMENT
Homemade Glazed Doughnuts
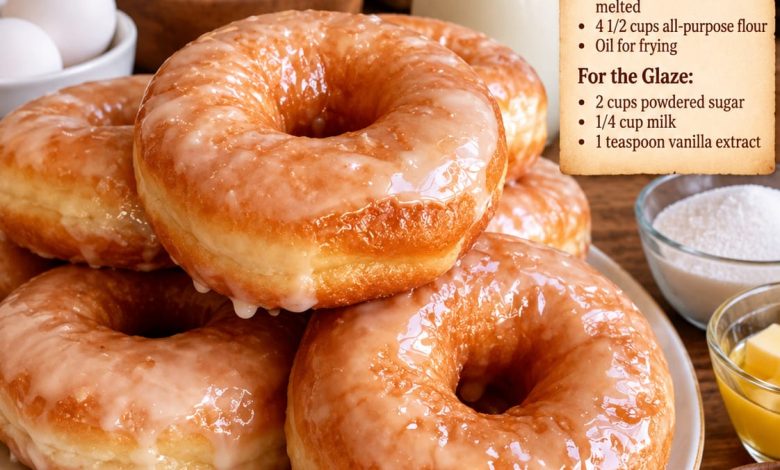
There is something incredibly comforting about a batch of warm homemade doughnuts covered in a thin, sweet vanilla glaze. Fresh from the fryer, these doughnuts have a beautifully golden exterior while the inside stays soft, light, and fluffy. Once dipped into the glaze, they develop that classic shiny coating that makes glazed doughnuts so irresistible.
Making yeast-raised doughnuts at home takes a little patience because the dough needs time to rise, but the process itself is surprisingly straightforward. The combination of milk, eggs, butter, and yeast creates a tender dough with a delicate richness, while frying gives each doughnut its signature golden crust. A simple powdered-sugar glaze finishes them perfectly.
These homemade glazed doughnuts are wonderful for breakfast, brunch, weekend baking, family gatherings, or simply as a special treat with a hot cup of coffee or cold glass of milk.
Ingredients
For the Doughnuts
1/3 cup warm water
2 1/4 teaspoons active dry yeast
1 1/2 cups whole or low-fat milk, warmed
1/2 cup granulated sugar
1/2 teaspoon salt
2 large eggs, room temperature
1/3 cup unsalted butter, melted and slightly cooled
4 1/2 cups all-purpose flour, plus more if needed
Vegetable or canola oil, for frying
For the Vanilla Glaze
2 cups powdered sugar
1/4 cup milk, plus more as needed
1 teaspoon vanilla extract
Pinch of salt, optional
ADVERTISEMENT
Preparation
1. Activate the Yeast
Pour the warm water into a large mixing bowl. The water should feel comfortably warm but not hot, ideally around 105–110°F.
Sprinkle the active dry yeast over the water and add about 1 teaspoon of the measured sugar.
Gently stir and allow the mixture to stand for approximately 5–10 minutes.
The yeast should become foamy on the surface. This is a good indication that it is active and ready to use.
2. Prepare the Dough
Add the warm milk, remaining granulated sugar, salt, eggs, and melted butter to the activated yeast.
ADVERTISEMENT
Mix until the ingredients are well combined.
Gradually begin adding the flour, about 1 cup at a time, mixing after each addition.
As the dough thickens, switch from a whisk or spoon to a dough hook if using a stand mixer.
Continue adding flour until a soft, slightly tacky dough forms. Avoid adding too much flour because a stiff dough can produce dense doughnuts.
3. Knead the Dough
Turn the dough onto a lightly floured work surface.
ADVERTISEMENT
Knead by hand for approximately 7–10 minutes, or knead with a stand mixer fitted with a dough hook for approximately 5–7 minutes.
The finished dough should be smooth, elastic, and soft.
If the dough sticks excessively to your hands, add flour 1 tablespoon at a time. Keep the dough as soft as possible for light and fluffy results.
4. First Rise
Lightly grease a large clean bowl.
Shape the dough into a ball and place it inside the bowl, turning it once so the surface is lightly coated.
ADVERTISEMENT
Cover the bowl with a clean kitchen towel or plastic wrap.
Place it in a warm, draft-free area and allow the dough to rise for approximately 1–1 1/2 hours, or until doubled in size.
Rising time can vary depending on the temperature of your kitchen.
5. Roll and Cut the Doughnuts
Once the dough has doubled, gently press it down to release excess air.
Transfer it to a lightly floured surface.
Roll the dough to approximately 1/2-inch thickness.
Using a doughnut cutter, cut the dough into rings. If you do not have a doughnut cutter, use one larger round cutter for the outside and a smaller cutter for the center.
Save the doughnut holes because they can be fried separately.
Gather the remaining scraps gently, reroll them once, and cut additional doughnuts.
ADVERTISEMENT
Avoid repeatedly working the scraps because this can make the final doughnuts tougher.
6. Second Rise
Arrange the cut doughnuts on lightly floured parchment paper or a baking sheet.
Leave enough space between them so they can expand.
Cover loosely with a clean kitchen towel and allow them to rise for approximately 30–45 minutes.
They should become noticeably puffy and light.
This second rise is particularly important for creating a soft, airy interior.
7. Heat the Frying Oil
Pour approximately 2–3 inches of vegetable or canola oil into a heavy-bottomed pot or deep skillet.
Heat the oil to 350°F (175°C).
Using a kitchen thermometer is highly recommended because maintaining the correct temperature is important.
If the oil is too hot, the outside of the doughnuts can brown before the inside cooks. If it is too cool, the doughnuts can absorb excessive oil.
8. Fry the Doughnuts
Carefully lower 2–3 doughnuts into the hot oil, depending on the size of your pot.
Do not overcrowd the pan.
Fry for approximately 45–60 seconds on the first side, or until beautifully golden.
Turn carefully and fry the second side for another 45–60 seconds.
The exact time may vary slightly depending on the thickness of the doughnuts and oil temperature.
Remove them using a slotted spoon or spider strainer.
Transfer to a wire rack positioned over a baking sheet.
Continue frying the remaining doughnuts while allowing the oil to return to 350°F between batches.
9. Prepare the Vanilla Glaze
While the doughnuts cool slightly, prepare the glaze.
Place the powdered sugar in a medium bowl.
Add the milk gradually while whisking until smooth.
Stir in the vanilla extract and a tiny pinch of salt if desired.
The glaze should be thin enough to coat the doughnuts smoothly but thick enough to remain visible after dipping.
If it is too thick, add milk about 1 teaspoon at a time.
If it becomes too thin, add a little additional powdered sugar.
10. Glaze the Doughnuts
For the classic glazed appearance, dip the warm doughnuts into the vanilla glaze.
You can dip only the tops or completely submerge each doughnut for a full coating.
Lift the doughnut from the glaze and allow the excess to drip back into the bowl.
Place the glazed doughnuts onto a wire rack.
Allow them to stand for approximately 10–15 minutes so the glaze can set slightly.
The glaze should develop a thin, shiny coating while the doughnut underneath remains wonderfully soft.
Tips for Light and Fluffy Doughnuts
The temperature of your liquids matters. Milk and water should be warm enough to activate the yeast but never hot enough to damage it.
Avoid adding unnecessary flour. A slightly tacky, soft dough usually produces a lighter doughnut than a dry, stiff dough.
Give the dough enough time to rise. Instead of relying only on the clock, look for the dough to approximately double in volume during the first rise.
The second rise should not be skipped. Puffy dough going into the fryer produces a noticeably lighter finished doughnut.
Maintain the frying oil at approximately 350°F. Temperature control is one of the most important parts of making consistently golden doughnuts.
Serving Suggestions
These glazed doughnuts are at their best when they are still slightly warm and the vanilla glaze has just begun to set.
Serve them with freshly brewed coffee, hot chocolate, tea, or a cold glass of milk.
For a brunch table, arrange them on a large serving platter alongside fresh berries, sliced fruit, eggs, and other breakfast favorites.
You can also decorate some of the doughnuts with sprinkles immediately after glazing them, before the glaze sets.
Flavor Variations
For a chocolate glaze, replace part of the powdered sugar with unsweetened cocoa powder and add enough milk to create a smooth consistency.
For a maple version, replace the vanilla with maple extract and add a small amount of maple syrup.
A fresh citrus glaze can be prepared by replacing some of the milk with lemon or orange juice and adding finely grated zest.
You can also leave the doughnuts unglazed and toss them while warm in cinnamon sugar for a simple variation.
Storage
Homemade yeast doughnuts are best enjoyed on the same day they are fried.
If you have leftovers, place them in an airtight container at room temperature and enjoy them within 1–2 days.
Avoid refrigerating them when possible because refrigeration can cause yeast doughnuts to dry out more quickly.
Unglazed doughnuts can be warmed briefly before serving and then finished with fresh glaze.
Conclusion
Homemade Glazed Doughnuts are one of those classic treats that are especially rewarding when made from scratch. From the moment the yeast dough begins to rise to the final dip in sweet vanilla glaze, every step contributes to their wonderfully soft texture and familiar bakery-style flavor.
The finished doughnuts have everything you want in this timeless treat: a golden exterior, a tender and airy center, and a delicate vanilla glaze covering every bite. Although they require a little more time than a quick cake doughnut, most of that time is simply allowing the yeast to work.
Serve them fresh and slightly warm for breakfast, brunch, dessert, or a special weekend treat. Once you experience a soft homemade doughnut straight from the fryer with freshly set glaze, it is easy to understand why this simple recipe remains such a beloved classic.